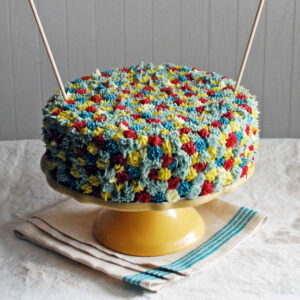
This beautiful white cake is covered in perfect buttercream frosting!

Two years ago I gave birth to my big boy.

Casper was a full two pounds heavier than my first baby and when he came out he looked like he was already three months old. I really missed having a tiny baby to hold (turns out its exhausting to bounce another two pounds to sleep). In the two years since he has certainly had his ups and downs. Luckily I think he hit the terrible twos early and is really turning into a sweetheart now. I was so excited to celebrate his birthday on Saturday with cake and a small party for family. Turns out even small parties can be stressful, but it really was a lot of fun.

The decorations came courtesy of Paper Cow, which I’ve mentioned before. They were beautiful and really added a lot to the party. The company was great to work with. When I told them I wanted to do bunting for the cake they helped come up with a solution even though they don’t ordinarily offer a product like that.


I didn’t have a need for all of the products that came with my Paper Cow purchase (I didn’t hand out favors, but if I had there would have been tags for that), but I chose to get creative with most of them. I attached the cupcake toppers to wooden dowels and placed them in some of the snacks we had. My son doesn’t sit in a high chair anymore, so I took the highchair banner and used it as a (poorly lit) photo prop. Cas actually did a great job holding it and I got a ton of funny photos of him declaring his age. Its a good thing, because I think he looks about seven years old here.

Party hats were definitely a splurge for me because no one ever keeps them on for more than two minutes. They were really cute though and the kids thought they were fun. Don’t forget, Paper Cow has offered 40% off your order of printable PDFs placed before September 1, 2013 if you mention The Live-In Kitchen!


I was so happy with how the cake turned out. I had given Casper several options of cakes I had saved to Pinterest and he chose this colorful one. I was initially a little disappointed (because I secretly wanted a cookie dough cake) but it turned out so beautiful, I’m sure he knew what he was doing. I am far from a professional cake baker and was terrified the whole time I was putting the cake together. I was worried that the cake would be a little “eggy” (there are six egg whites in it) but despite its initial eggy appearance coming out of the oven it was fine. As frosted layers it was dense yet airy and someone asked if it was a pound cake. The flavor was great and I think it turned out well even though I can’t measure flour very well.


This was my first time using the India Tree Natural Decorating Colours I had purchased. I was initially concerned that I wouldn’t be able to match the frosting to the decorations, but these dyes were actually perfect for matching the hipster coloring of everything else. While it did require quite a bit of dye to get the deep colors I didn’t have to feel weird about it because these dyes are all natural, made from vegetable extracts. While each color did taste a little different in the frosting, it by no means tasted bad or even like anything in particular. When it came down to it, it was just cake and frosting and it all tasted great. The recipe below makes a ton of frosting. I knew I wouldn’t be comfortable if I had to ration it out so I purposely made more than I needed, anticipating throwing some away (read: eating it straight out of the bowl). If you’re not into waste, start by halving the recipe and making more if you need to.

I was happy we got a family picture taken before the day was over even though, obviously, we’re not great at taking family pictures.


Happy birthday, Casper!
Recipe
White Cake with Buttercream Frosting
Ingredients
Cake
- 1 cup milk,, at room temperature
- 6 large egg whites,, at room temperature
- 2 teaspoons almond extract
- 1 teaspoon pure vanilla extract
- 2 ¼ cups cake flour
- 1 ¾ cups granulated sugar
- 4 teaspoons baking powder
- 1 teaspoon table salt
- ¾ cup unsalted butter,, softened but still cool
Frosting
- 1 cup unsalted butter,, softened
- 1 cup shortening
- 7 cups confectioner’s sugar
- ½ teaspoon table salt
- 1 tablespoon pure vanilla extract
- 5 fluid ounces heavy cream
Instructions
- Preheat the oven to 350ºF. Grease two 8-inch cake pans with shortening and dust with flour, tapping out excess.
- In a medium bowl, whisk together milk, egg whites, almond extract, and vanilla extract until blended.
- In the bowl of a stand mixer fitted with the paddle attachment, mix cake flour, sugar, baking powder, and salt on low speed. Cut the butter into cubes and add to the flour mixture, continuing to beat on low for 1-2 minutes.
- Add all but ½ cup of the milk mixture and beat at medium speed for 1 ½ minutes. Add the remaining ½ cup of the milk mixture and beat for about 1 minute more. If necessary, scrape down the bowl and beater to remove any chunks and mix until the batter is a smooth consistency.
- Pour the batter evenly between the two prepared cake pans. Bake until a toothpick inserted in the center comes out clean, 27-30 minutes. Allow the cake to cool to room temperature before removing from the pans. Once completely cooled, wrap the cake tightly in plastic wrap and place in the freezer. When you are ready to frost the cake, remove it from the freezer to thaw at room temperature while you prepare the frosting.
- In a large bowl, cream butter and shortening with an electric mixer until fluffy. Add the confectioner’s sugar two cups at at time until well incorporated. If the frosting gets too thick to be mixed you can add some of the heavy cream to thin it out. Add the salt, vanilla, and heavy cream and blend until combined, then blend on high until the frosting is light and fluffy. If you want a thinner frosting you can add more heavy cream (I recommend doing 2 teaspoons at a time), and if you prefer it sweeter you can add another cup of confectioner’s sugar.
- Divide frosting into separate bowls and tint to desired color with food coloring, mixing well. I left some white to use in the middle of the cake as well as a base for the rest of the decoration. Place one of your cold cakes onto the cake stand or platter you plan on using. Using an offset spatula, place a scoop of frosting in the center of the cake and spread it evenly across. Place the other cake carefully on top, making sure to line up the edges with the other cake. Place another dollop on top of this cake and spread a thin, even layer over the top and down onto the sides. Use this frosting to very thinly coat the entire cake, evening out any holes or edges and smoothing the sides.
- I used Wiltons tip #233 and disposable pastry bags to pipe the colored frosting onto the cake. I held the tip to the cake and gave it a little burst to create the dots. It worked best with cold frosting. The warmer frosting made blobs while the cold frosting held its stippled shape really well. I stored the other colors of frosting in the refrigerator while I was working with another one and gave them a good stir before placing them in the piping bags.
- Place the cake in the refrigerator until the frosting “crusts” a bit, then cover loosely with plastic wrap and store in the refrigerator until ready to serve.

gillian @ the haas machine says
So amazing! You have one incredibly blessed little man. Happy birthday Cas!!
Chelsea {Whatcha Makin' Now?} says
Those family pictures are priceless! And the cake looks delicious. I agree, even small parties are a lot of work but yours looks so fun!